
How AI Is Transforming Daily Work in Service Teams
Reduce downtime and improve service efficiency with AI-powered troubleshooting. Learn how service teams use ilean to solve problems faster and capture knowledge.
In AutoCAD Civil 3D, you can create, work with, and manage points using a variety of commands and tools.
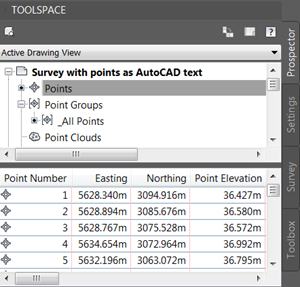
The points created by AutoCAD Civil 3D are called Coordinate Geometry (COGO) points, which are very different from AutoCAD point nodes. COGO points, in addition to coordinate data, have a variety of properties associated with them, including point number, point name, raw (field) description, and full (expanded) description. COGO points can be stored in a project outside a drawing and referenced by multiple users.
However, AutoCAD Civil 3D doesn’t include a built-in tool to convert points represented as AutoCAD text into COGO points. So, the below steps guides you how to achieve that goal.

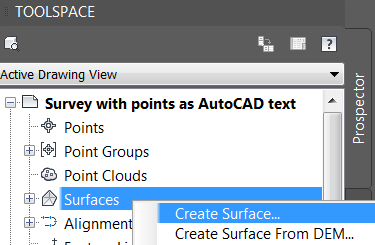
Create a new empty surface by right-clicking on Surfaces in Prospector as shown below. If the Prospector palette is not showing, click on the two red boxes as shown in the screenshot below so that they are highlighted.
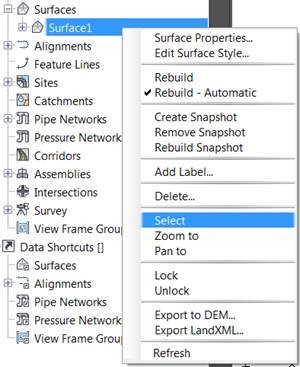
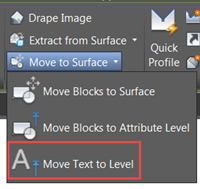
Select the surface from Prospector to show the contextual ribbon.
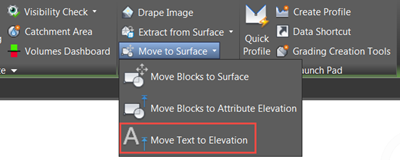
On the contextual ribbon, click on ‘Move Text to Elevation’ and select the text objects. This will make the Z coordinate for the text equal to the text content. If you are using the ‘UK English’ version of Civil 3D the command will be ‘Move Text to Level’.
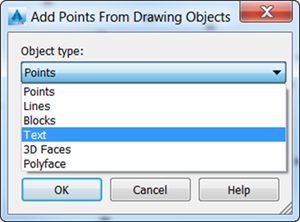
Add the text points to the surface from Prospector as below. The points will take the elevation from the Z coordinate of the text and its position will be the insertion point of the text (the point where the square grip appears when you select the text in AutoCAD).

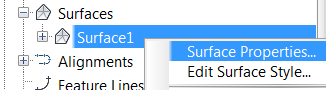
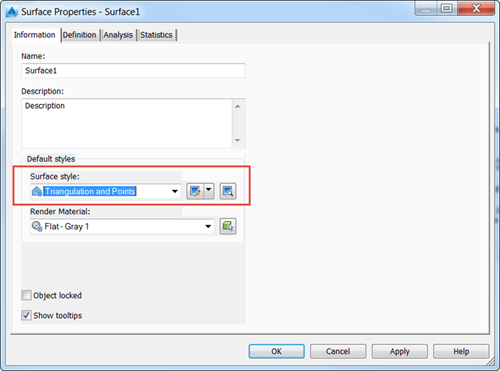
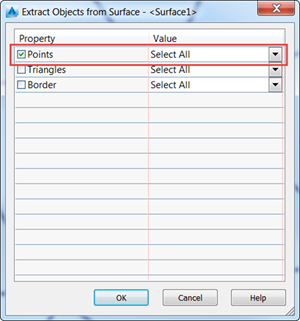
Go to Surface Properties and select a style that shows the points. Otherwise, the option ‘Points’ will not be available in the next step.
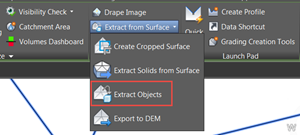
Select the surface and, on the contextual ribbon, click on ‘Extract Objects’. That will insert AutoCAD points in the drawing from the surface.
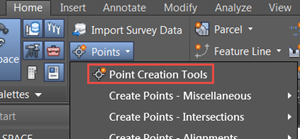
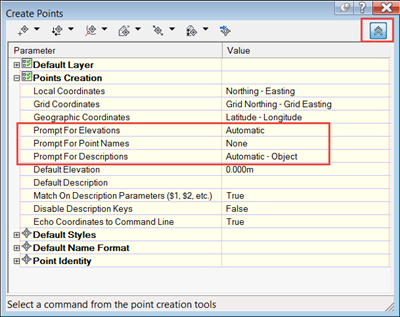
Modify your point settings so you don’t have to hit enter for a description or name after each point is created.
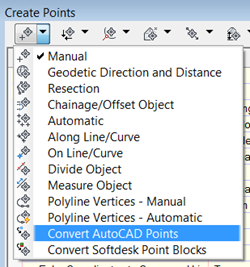
Finally, from the first drop-down menu in the previous window, convert the AutoCAD points to COGO Points. The COGO points will be visible in the drawing and listed in Prospector under Points. They will also be included in the _All Points group.
We hope you found this tip useful.
If you would like to brush up on your AutoCAD Civil 3D skills and make the most of its tools, explore our Essentials course. We also run a variety of AutoCAD Civil 3D courses that may be of interest to you!
For more information on Civil 3D or any of our Autodesk Software, please contact us by emailing info@symetri.co.uk.
Reduce downtime and improve service efficiency with AI-powered troubleshooting. Learn how service teams use ilean to solve problems faster and capture knowledge.

Cybersecurity risks are not always caused by sophisticated attacks or major system failures. In many cases, risk builds quietly through everyday habits, overlooked processes, and limited visibility into where data is stored or how users interact with systems.

Learn how to reduce cyber risk through stronger security foundations. This month's bulletin covers home office security, legacy technology risks, vulnerability management, MFA, and cybersecurity best practices.