
How AI Is Transforming Daily Work in Service Teams
Reduce downtime and improve service efficiency with AI-powered troubleshooting. Learn how service teams use ilean to solve problems faster and capture knowledge.
Design automation is a luxury that has been used for several years within the Autodesk Revit software platform and Dynamo. Many architects, structural and building service engineers and technicians have used Dynamo to automate tasks from modeling and placement of elements to the input and extraction of data.

One of the new features in Autodesk Civil 3D 2020 was the inclusion of Dynamo which integrates visual programming with civil features such as alignments, corridors and points. Workflows are also available for vanilla AutoCAD giving access to features such as layers, attributes and text as well as geometry such as 3D polylines, lines & blocks.
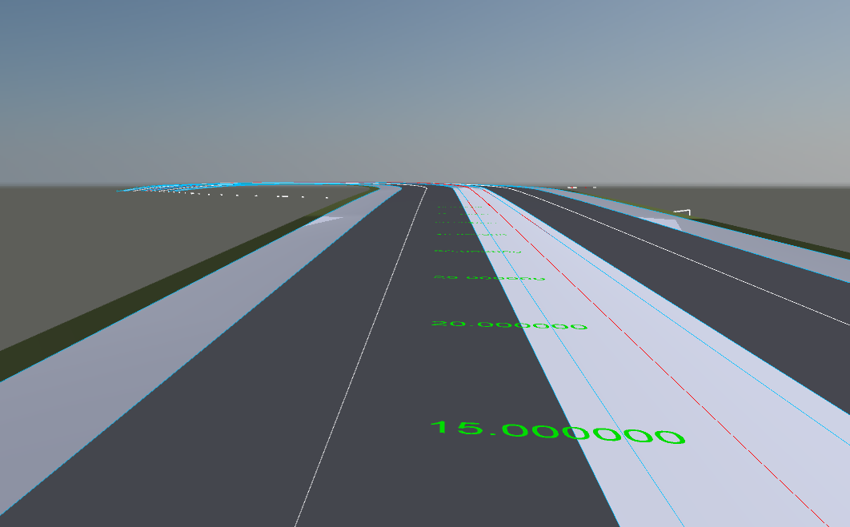
There are potentially thousands of use cases that you could use to streamline existing workflows, not just with Civil 3D but also taking data and geometry to other applications such as Revit. In this example I will extract alignment information and recreate this data as AutoCAD text nested into a block. Why am I doing this? Well, if I want to export my Civil 3D model to Navisworks, it is often useful to see the chainage super imposed over the 3D geometry. This is one way to achieve this with Dynamo! Of course, this data could also be used to place 3D families in Revit to display the same chainage and setting out data.
Below is the result in Navisworks.
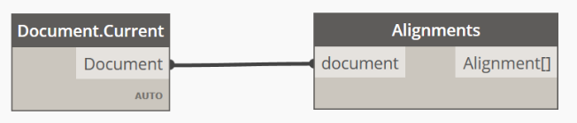
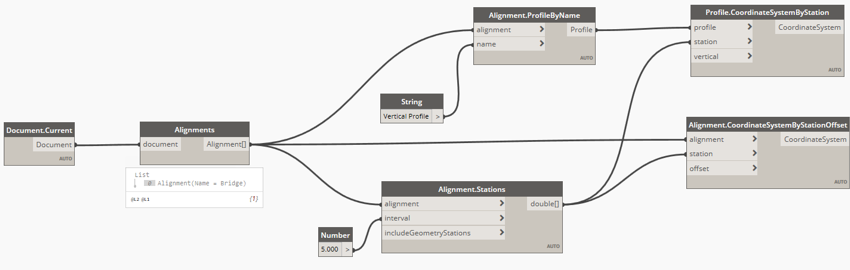
The first step is to connect to the active document and get the alignment data.
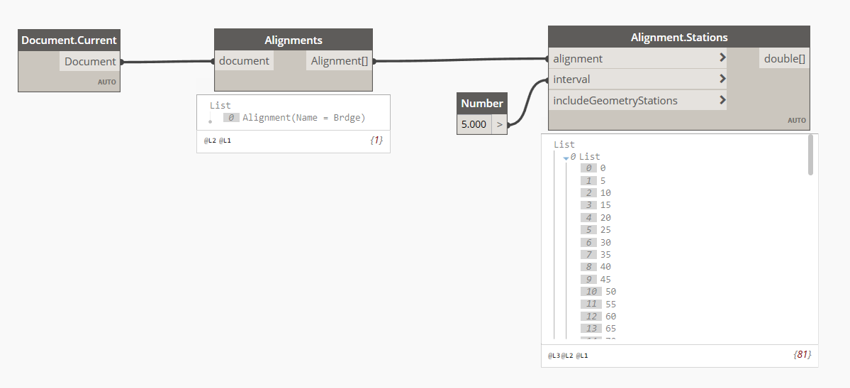
If there are multiple alignments in the Civil model you can select the alignment by a matching name or filter the data based on any criteria. Once the alignment has been selected, I will then retrieve the stations at 5 meter intervals.
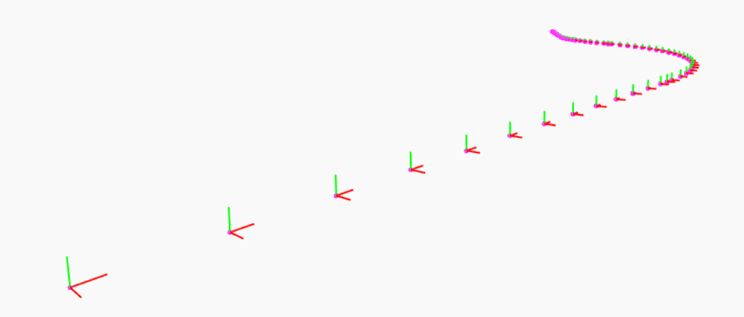
The stations (chainage) values are then passed into the Alignment.CoordinateSystemByStationOffset node. This node will create coordinate systems at each station. You can also add an offset value if required but here I am simply extracting the alignment coordinate systems at each station.

Dynamo will also produce a graphical representation of the coordinate systems. Here you have the z value aligned with the alignment and XY plane is normal to the alignment.
This is good for a flat plan representation of the alignment. Here I would like to retrieve the vertical positions at each of the stations. To achieve this, I will need to extract the coordinate systems from the vertical profile. The image below now shows the same data used to create coordinate systems on the vertical profile.
In order to create the text elements, I need to extract the coordinate system origin. I also get the x-axis of the coordinate system to control the rotation of the text elements.
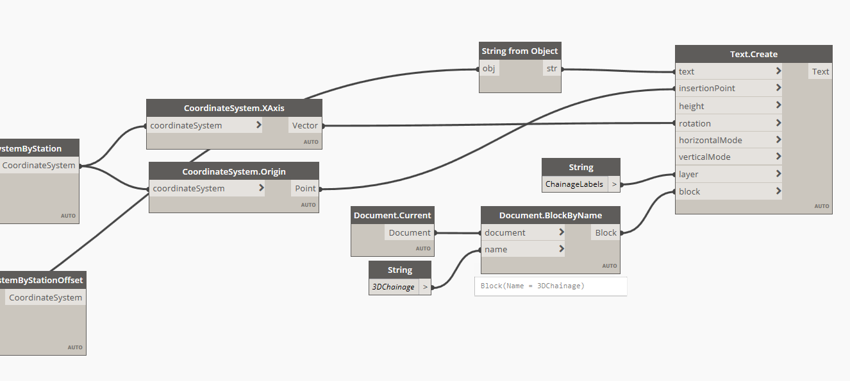
The text create node requires the chainage values to be strings so I needed to use the string from object node to convert the numbers to strings. The rotation is simply the coordinate system X-Axis which outputs vectors. The layer is just a string input, AutoCAD will create a layer automatically or this can be an existing layer. The block will contain all the text objects and allows Dynamo to update the contents otherwise the text would be appended.
The script can be developed further to create an offset for the text depending on other geometry. You will certainly need to offset the text position in the z axis so it does not glitch with the road surface. In the image below you can see that the X,Y and Z point data is derived from the list of points. A simple addition is made to provide lateral and vertical offset controlled by sliders. The X,Y and Z coordinates are then combined back together and passed to the Text.Create node.

If you would like more information on the Dynamo for Civil 3D, please call 0345 370 1444 or email info@symetri.co.uk.
Reduce downtime and improve service efficiency with AI-powered troubleshooting. Learn how service teams use ilean to solve problems faster and capture knowledge.

Cybersecurity risks are not always caused by sophisticated attacks or major system failures. In many cases, risk builds quietly through everyday habits, overlooked processes, and limited visibility into where data is stored or how users interact with systems.

Learn how to reduce cyber risk through stronger security foundations. This month's bulletin covers home office security, legacy technology risks, vulnerability management, MFA, and cybersecurity best practices.