
How AI Is Transforming Daily Work in Service Teams
Reduce downtime and improve service efficiency with AI-powered troubleshooting. Learn how service teams use ilean to solve problems faster and capture knowledge.
If you are tasked with the responsibility of creating room drawings in Revit, then you know that whilst the standard Revit approach isn’t difficult, it can be extremely tedious and time consuming. For example, if you are working on a multi-storey building design, you may need to create hundreds of rooms.
Fortunately, the Revit add-in, Naviate, now offers an innovative solution for addressing this aspect of your workflow via the use of the Room Drawing tool. The Room Drawing tool is a sophisticated command that simply automates the process of creating room drawings.
The tool comes as part of the Naviate Architecture toolset and is highly intuitive to use. The different features and settings from within this command provide its users with powerful functionality for generating multiple room sheets in just a few clicks.

After launching the tool, the process begins by configuring the settings for your room drawing requirements from the Room Drawing Dialogue.
Under the Room Selection panel on the left, a list of rooms from your project will be displayed. Above the room list is a filter search that will allow you to filter by room name or number. The filter search also allows you to create an advanced filter by parameter value.
At the bottom of the Room Selection panel is a small report showing the total number of rooms created. You will notice in this example, that there are 260 rooms in this project.
From the room list you can simply select the rooms for which you wish to create room drawing sheets.
In this example, x2 rooms have been selected.
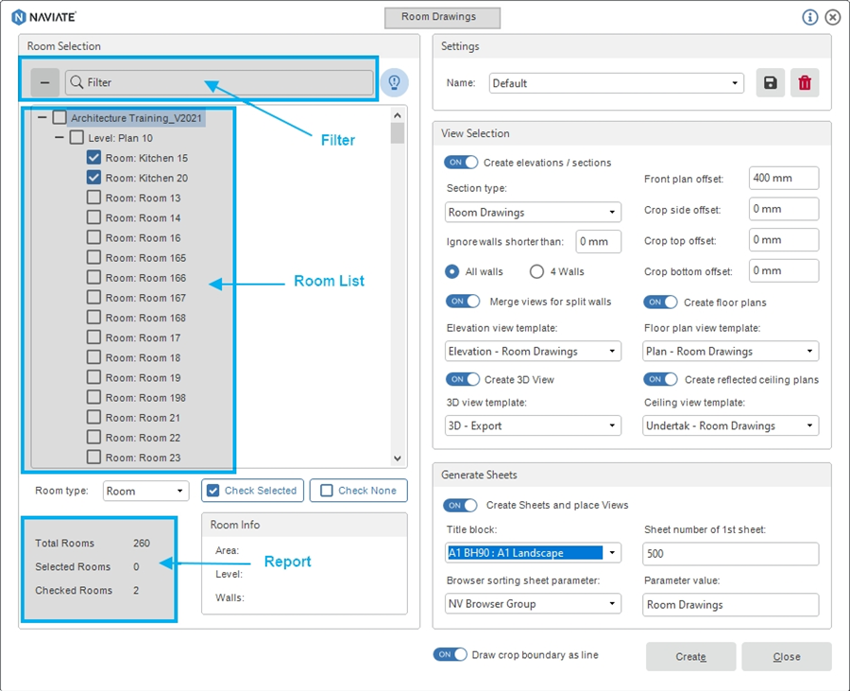
Directly to the right, you will notice a Settings panel which allows you to save your configured settings for future use.
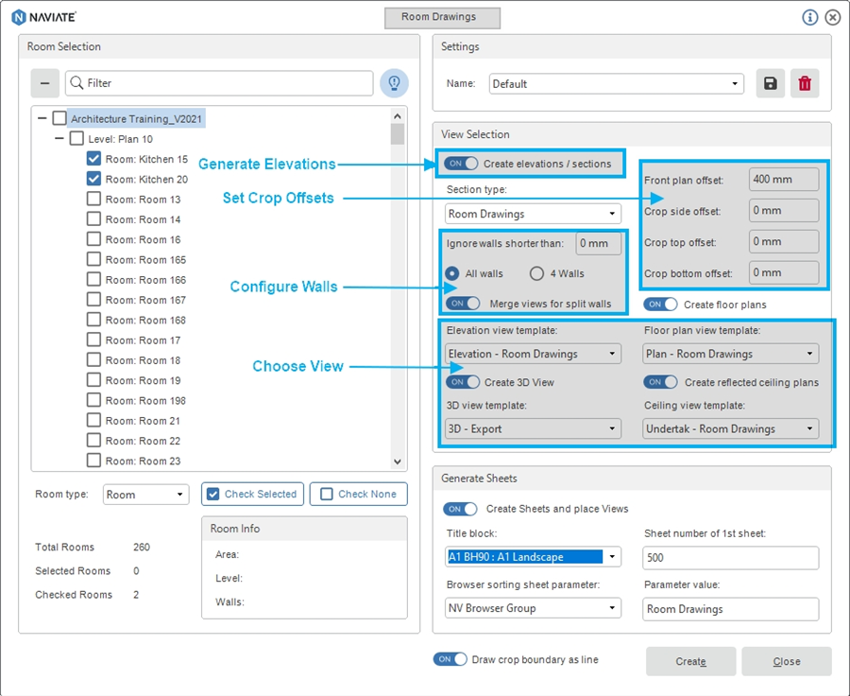
Underneath this is the View Selection panel and in here are a number of different options that enable you to choose from the view types and view templates that you wish to include in your sheet setup.

The first setting you come across is a toggle button which can be switched on or off. Toggled on will generate the elevation views for your rooms.
To the right of this are settings that will allow you to set the crop offsets for views when placed onto their sheets. In this example, the front plan offset has been set to 400mm.
Within the View Selection panel, you can also choose which walls to include in the room drawing.
The All Walls option will create a view for every wall within the room whilst the 4 Walls option will create a view of walls for each North, South, East and West orientation of the room.
The Merge Walls setting allows any walls that have a gap to be merged when shown on the room drawing sheet.
The next step involves choosing which view types and view templates to include as part of your room drawing setup.
The Room Drawing tool will allow you to include a floor plan, ceiling plan and even a 3D view which is a nice extra feature to show on your drawing.
In this example, all view types have been selected. Underneath each view type, you also have the ability to choose a template to add to your room drawing configuration.
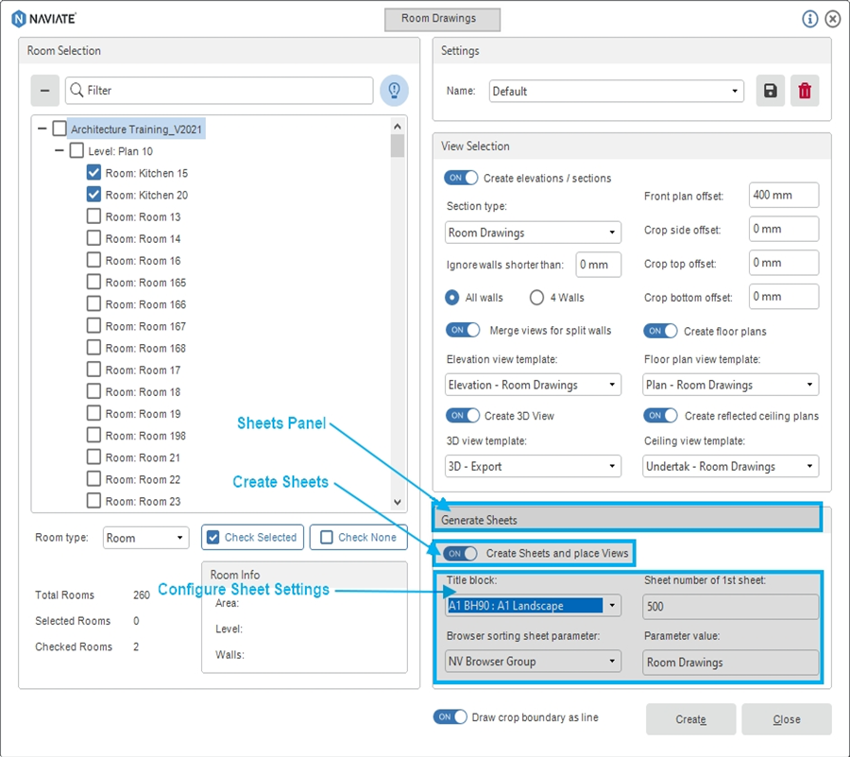
The final step involves creating your sheets.
In the Generate Sheets panel, switch the toggle button on in order to create your sheets and plan views. Then choose from the Title Block setting the sheet size you want use.
Ensure that you choose a sheet size that will accommodate the items you have chosen to include as part of your room drawing.
From the remaining settings, you can then configure your browser sorting and sheet parameter information.
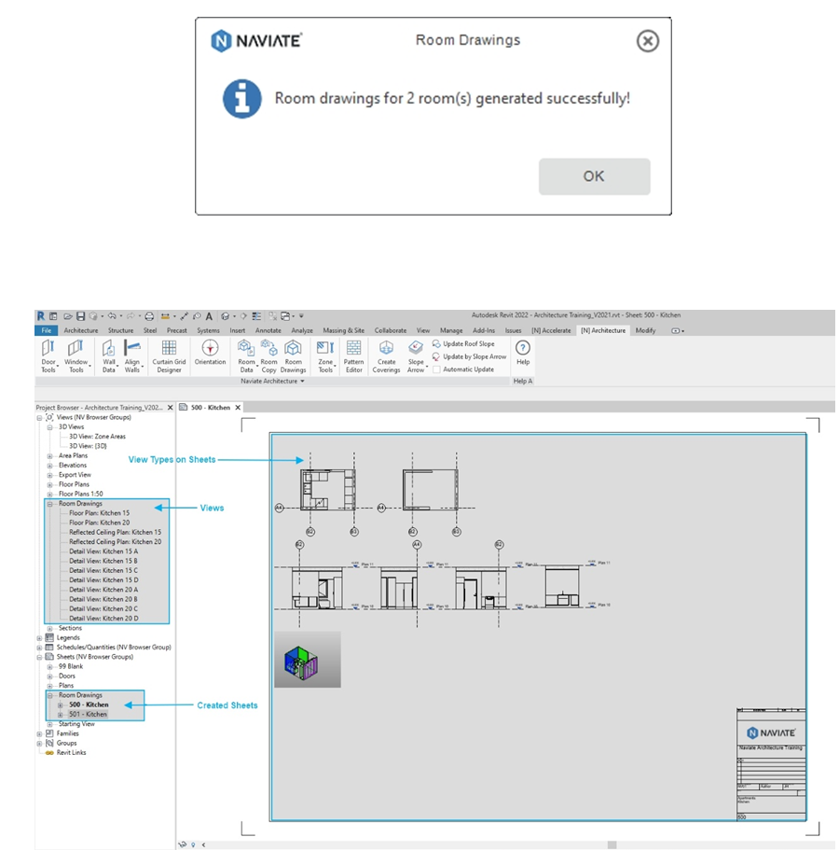
Once you have configured all of the Room Drawing settings, you can then hit the Create button which will start the process of generating your room drawings and sheets.
Once this is complete, a report will indicate the number of room drawings that have been successfully created. Simply click OK and go to your Revit Project Browser to view the newly created sheets.
As an Architect or Designer there may be many challenges that you face at different stages of the project lifecycle. Here at Symetri, one of the challenges we often come across from speaking with industry professionals is the need for tools that will enable automation around some of the mundane tasks that are frequently associated with the output for construction documentation.
With the Revit add-in, Naviate, there are hundreds of tools and functions that are there to help optimise the way that you work. Our tools are focused on providing automation to many different workflows when working within Revit. The idea behind every single function of the software is to save you time so that you can focus on the interesting parts like design whilst Naviate takes care of those repetitive and mundane tasks that you want to avoid.
To find out more about Naviate, the Revit add-in, visit our webpage or download our whitepaper here.
Reduce downtime and improve service efficiency with AI-powered troubleshooting. Learn how service teams use ilean to solve problems faster and capture knowledge.

Cybersecurity risks are not always caused by sophisticated attacks or major system failures. In many cases, risk builds quietly through everyday habits, overlooked processes, and limited visibility into where data is stored or how users interact with systems.

Learn how to reduce cyber risk through stronger security foundations. This month's bulletin covers home office security, legacy technology risks, vulnerability management, MFA, and cybersecurity best practices.