
How AI Is Transforming Daily Work in Service Teams
Reduce downtime and improve service efficiency with AI-powered troubleshooting. Learn how service teams use ilean to solve problems faster and capture knowledge.
In January 2020, Excitech was acquired by Addnode Group, the owner of Symetri, Europe’s leading provider of software and services for design and engineering activities.
Excitech has now become Symetri, operating as one company since the beginning of January 2021. Please rest assured it is business as usual for us and your service experience will not be impacted.
In this blog post, we’ll take a look at some tips that you can start to utilise on your next Revit RC project.

We recently ran a live webinar which looked at the benefits of 3D modelling and detailing of reinforcement bar within Autodesk Revit 2022.
During the webinar we investigated some of the key benefits of modelling and detailing reinforcement in 3D, the primary benefits are listed below.
If you were unable to attend this or missed the session you can watch the YouTube video below.
The second section of the presentation focused on a range of tips and tricks for fast and efficient modelling and detailing of rebar.
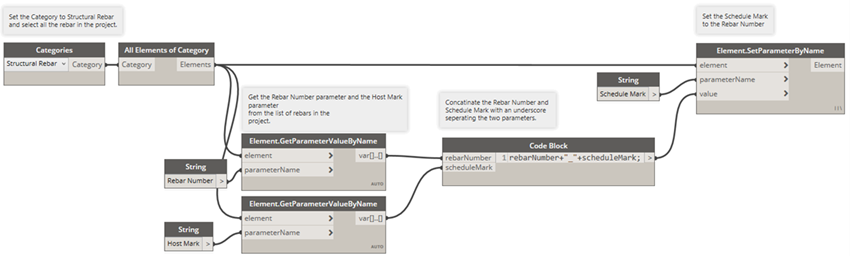
The first tip that you can implement almost immediately is selecting Rebars by their bar mark. Prior to the release of Autodesk Revit 2015, the bar mark was controlled with a built-in parameter called ‘Schedule Mark’ which was a manual input. We have to be mindful that the rebar number could be repeated within larger projects so we will concatenate the ‘Host Mark’ and ‘Rebar Number’ to create a unique bar mark.
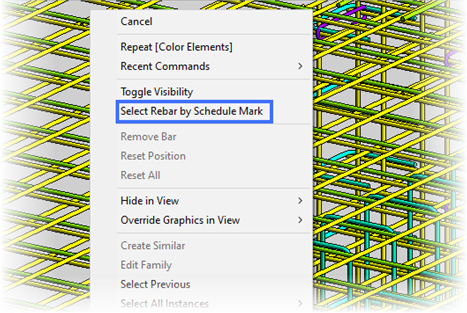
With the simple Dynamo script shown below, you can take the Rebar Number (the automated bar mark) and apply this to the Schedule Mark. This enables you to make intelligent selections of rebars based on the Host Mark and the Rebar Number.
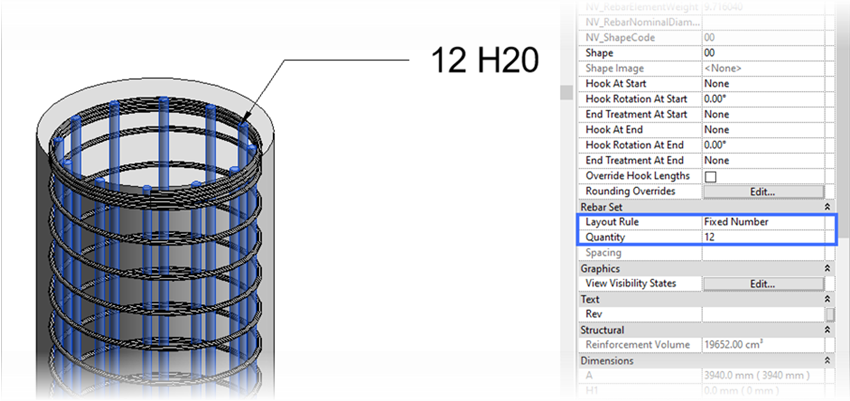
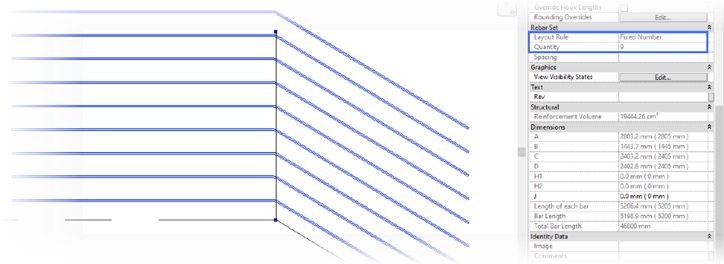
When detailing elements such as circular columns and piles, you can use freeform rebar to add the main reinforcement bars as a Rebar Set. Rebar Sets have many advantages over a separate ‘array’ or copies of singular rebars. The software performance is better, it is easier to schedule, quicker to edit and update, and you can add a tag that calls off the total number of rebars.
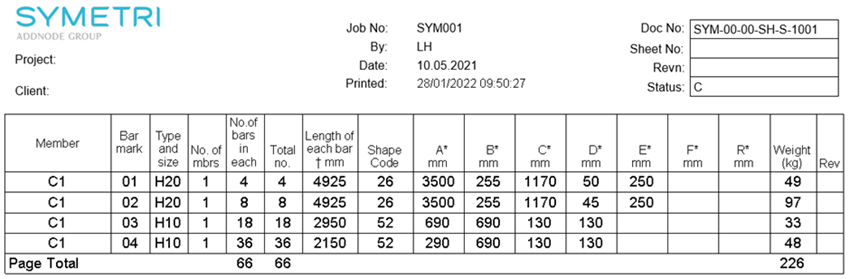
In 2020, the British standard BS8666:2005 was superseded to make the standard more relevant in our growing digital era. Two new shape codes were introduced along with the requirement to calculate and display the weight of each row in the bending schedule.
You can calculate the weight of rebar by editing the rebar shape families within Autodesk Revit. For example, if you are editing shape 00 and have added two shared parameters, ‘MassKgPerMetre’ and ‘RebarElementWeight’, you can calculate the mass per metre of the rebar by using a nested if statement.
if(Bar Diameter = 6 mm, 0.222, if(Bar Diameter = 8 mm, 0.395, if(Bar Diameter = 10 mm, 0.616, …..
The above if statement will calculate the mass per metre based on the bar diameter. For instance if the bar diameter is 10mm, the mass per metre will be 0.616Kg.
You can then multiply the mass by metre with the ‘Length of each bar’ (this is the total length of the rebar), which will then derive the actual weight of each rebar.
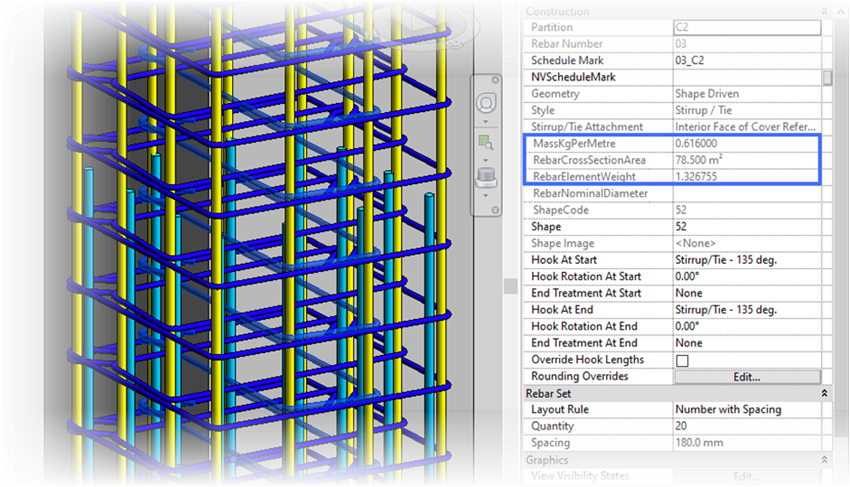
The above image shows a link (Shape Code 52) that has extra information carried as instance parameters in the properties palette. Of course, you can then add this to the schedule and calculate the total weight by multiplying the ‘RebarElementWeight’ by the Quantity.
Some reinforcement arrangements still prove challenging to model with Autodesk Revit. A great example of this is the cranked bar modelled as a rebar set shown below.

Fortunately, this arrangement of reinforcement can be modelled as a rebar set with the help of Dynamo. In the example below, the user selects the cranked rebar, a detail line that represents the direction and the intended spacing. The rebars are then created using freeform rebar.
Fortunately, this arrangement of reinforcement can be modelled as a rebar set with the help of Dynamo. In the example below, the user selects the cranked rebar, a detail line that represents the direction and the intended spacing. The rebars are then created using freeform rebar.
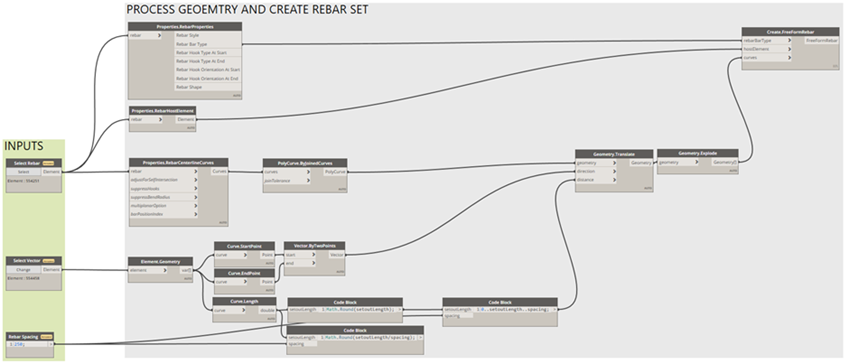
The freeform rebar set can then be scheduled and tagged and will show the quantity of rebars in the set. This technique can be used for many of the challenging rebar arrangements that crop up when detailing.
To summarise, we hope that this blog post has provided you with some interesting insights on rebar modelling, detailing, and scheduling using Autodesk Revit and Dynamo. To help you along your journey, we’ve put together some specific training courses on reinforced concrete detailing and Dynamo.
View training courses:
Reinforced Concrete Detailing for Autodesk Revit
Dynamo Fundamentals for Autodesk Revit
For more information on modelling reinforcement in Revit or to enquire about our courses, please get in touch.
info@symetri.co.uk
0345 370 1444
Reduce downtime and improve service efficiency with AI-powered troubleshooting. Learn how service teams use ilean to solve problems faster and capture knowledge.

Cybersecurity risks are not always caused by sophisticated attacks or major system failures. In many cases, risk builds quietly through everyday habits, overlooked processes, and limited visibility into where data is stored or how users interact with systems.

Learn how to reduce cyber risk through stronger security foundations. This month's bulletin covers home office security, legacy technology risks, vulnerability management, MFA, and cybersecurity best practices.