
How AI Is Transforming Daily Work in Service Teams
Reduce downtime and improve service efficiency with AI-powered troubleshooting. Learn how service teams use ilean to solve problems faster and capture knowledge.
Autodesk Inventor 2019 – Keep your iLogic assembly code tidy - Useful tips
See our overview of the new iLogic features in the two Autodesk Inventor 2019 videos below:
Note: the below videos were created by Excitech prior to becoming Symetri in January 2021, following its acquisition by Addnode Group. All Excitech products, services and solutions mentioned in these recordings are available through Symetri.
Introduction to the additions - 38min 30 seconds onwards
Some examples of how the new features can be used - start until 26 minutes.
Moving on from the above videos, I wanted to blog a few very basic tips for housekeeping your iLogic assembly code - in particular, how to keep the iLogic rule nice and neat once you’ve done the ‘capture current state’ operation (shown at 43 minutes 0 seconds in the first link above).
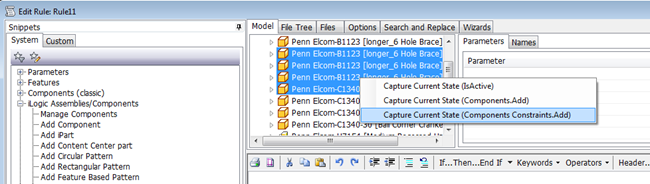
This operation is fantastic for creating a huge amount of code very quickly, but for future debugging purposes, I’d really recommend going in and cleaning up the code Autodesk Inventor 2019 has helpfully created for you. So what can you do?
1. Consider defining a load of file names at the start of the rule, to keep the rest of the code brief and easy to read. Something like this:
Dim LargeLatch As String = "Penn Elcom-L944-537-10MOL4 [Large Latch & Lock]-Full.ipt"
Dim MedLatch As String = "Penn Elcom-l907-928 [Medium Latch Cranked]-Full.ipt"
Dim LargeHinge As String = "Penn Elcom-P2554Z [Large Hinge]-Full.ipt"
Dim MedHinge As String = "Penn Elcom-P2593 [Medium Hinge]-Full.ipt"
Then replace any file names in the captured code with the shorter variables.
E.g. replace:
"Penn Elcom-L944-537-10MOL4 [Large Latch & Lock]-Full.ipt" with LargeLatch
2. Whenever you’ve added a component occurrence with ‘Components.Add’, consider letting Autodesk Inventor 2019 give it a ‘default’ name to avoid name conflicts. To do this - you just leave the component name blank (“”), then Autodesk Inventor 2019 will give the component a default name, which is the name of the file (minus the file extension), and a incremented counter (:1, :2, :3 etc.).
So instead of this:
Dim Latch1 = Components.Add("Penn Elcom-L944-537-10MOL4 [Large Latch & Lock]-Full:4", "Penn Elcom-L944-537-10MOL4 [Large Latch & Lock]-Full.ipt")
Use something like this:
Dim Latch1 = Components.Add("",LargeLatch)
Of course, you might want to define a nice short name for the component occurrence, to keep the model browser nice and neat. This can be anything you want, for example:
Dim Latch1 = Components.Add("L1",LargeLatch)
3. If you’ve also captured constraints for the component (instead of just grounding it), consider using the .Name property of the component you just added to create any constraints on it. So using the ‘Latch1’ component we just added as an example:
Instead of this:
Constraints.AddFlush("Flush:262",
"Penn Elcom-L944-537-10MOL4 [Large Latch & Lock]-Full:4,
"Work PlaneA", "Master Part:1",
"Work PlaneA", -1.5 mm)
Use something like this:
Constraints.AddFlush("",
Latch1.Name,
"Work PlaneA", "Master Part:1",
"Work PlaneA", -1.5 mm)
Note, just like with the component names above, you don’t need to tell Autodesk Inventor 2019 what name to give a mate or flush constraint, just let Inventor assign the next available name to the constraint and there’s no chance of conflict with any existing constraint names.
4. Extra credit: The eagle-eyed iLogicians amongst you will have spotted that when you add a component with a statement like this:
Dim Latch1 = Components.Add("",LargeLatch)
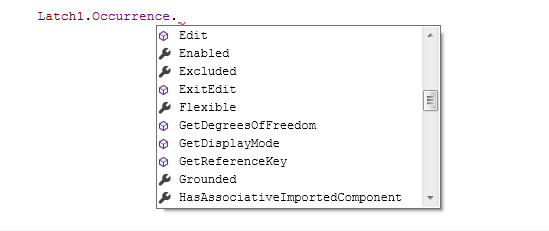
‘Latch1’ then gives you access to the ‘component occurrence’ object, which you can do other stuff with, such as
Latch1.Occurrence.Visible = False
Or
Latch1.Occurrence.Transparent = True
And loads of other stuff, just by hitting ‘.’ (welcome to the Autodesk Inventor 2019 API, and hooray again for intellisense in iLogic).
Thats all for today. See you next time.
Reduce downtime and improve service efficiency with AI-powered troubleshooting. Learn how service teams use ilean to solve problems faster and capture knowledge.

Cybersecurity risks are not always caused by sophisticated attacks or major system failures. In many cases, risk builds quietly through everyday habits, overlooked processes, and limited visibility into where data is stored or how users interact with systems.

Learn how to reduce cyber risk through stronger security foundations. This month's bulletin covers home office security, legacy technology risks, vulnerability management, MFA, and cybersecurity best practices.