Assets Configuration
As with all other modules, Assets can be activated for specific projects, through the project administration pages.
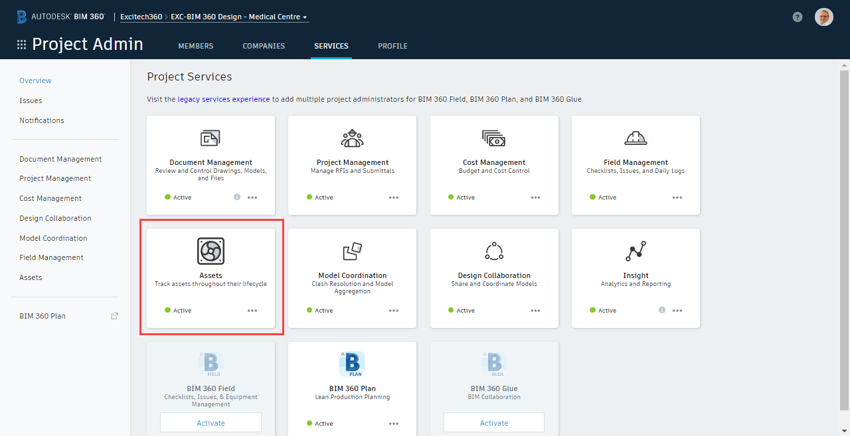
Fig. 1 Module Activation
Once activated, there are several steps required to set-up the module: asset categories, custom attributes, and status sets. There is a default status set, but you will need to add your own to match your asset management procedures, for specifying, purchasing, and commissioning. For the installation and commissioning stages, you can assign checklists to your asset categories (I will cover this later in the blog).
Creating your status sets is a quite simple process, select create and name it, and add the various stages through which the asset will progress. Once created, these status sets can be assigned globally, or to individual asset categories / sub-categories.
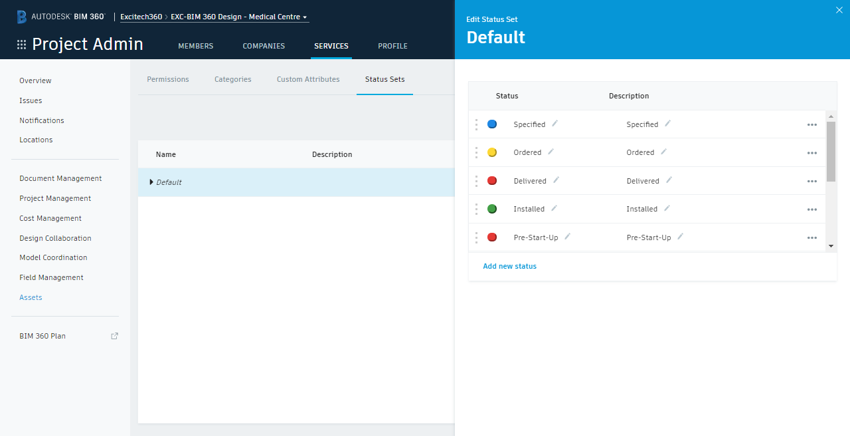
Fig. 2 Status Set Creation
As you begin to configure your asset categories (and sub-categories), you will see that the relevant status set can be selected along with any custom attributes that you have created. A status set can be specified at all levels from “All Categories” to a specific sub-category. Now it should be noted here that the asset import feature allows you to automate the category creation process. However, this process will not assign status sets to the categories (other than the “default” set). You may also have to then set the status set for each category, along with the specific status of each asset. If you only require a single status set, you can modify the default set and mitigate this to an extent. The asset import procedure will be covered later in the blog.
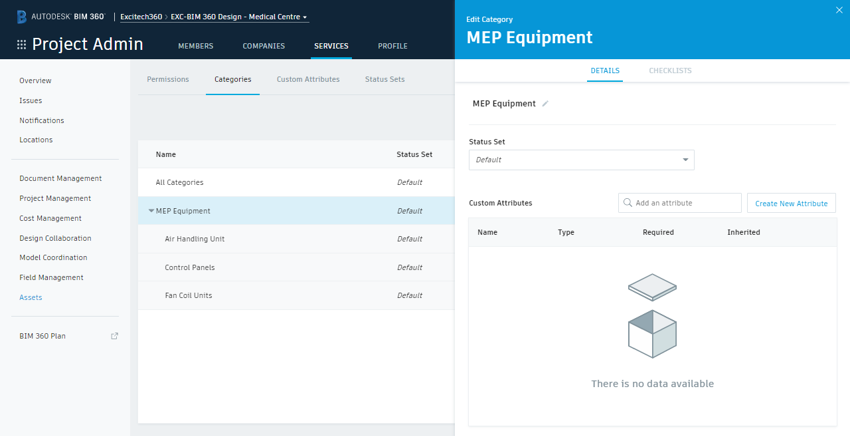
Fig. 3 Asset Category Configuration
You will also see that checklist templates can be assigned at this point. Checklists (and templates) are created in the BIM 360 Field Management module and cover quality checks, safety inspections, installation checks, to name just a few. This part is not required for the asset loading process and could easily be configured later, but it does make sense to consider them in your overall strategy. In addition, issues generated from negative responses to asset linked checklists, are stored under the asset, as well as in the issues section of docs. This is especially useful if you have to clear any snags associated with an asset before handover and can be accessed via the asset barcode.
Adding Assets
With the configuration complete, assets can be added to BIM 360. This can be done individually but is best done through the import feature. When you click the import button you will see an option to download a template spreadsheet. The downloaded spreadsheet contains a small number of example assets for reference.
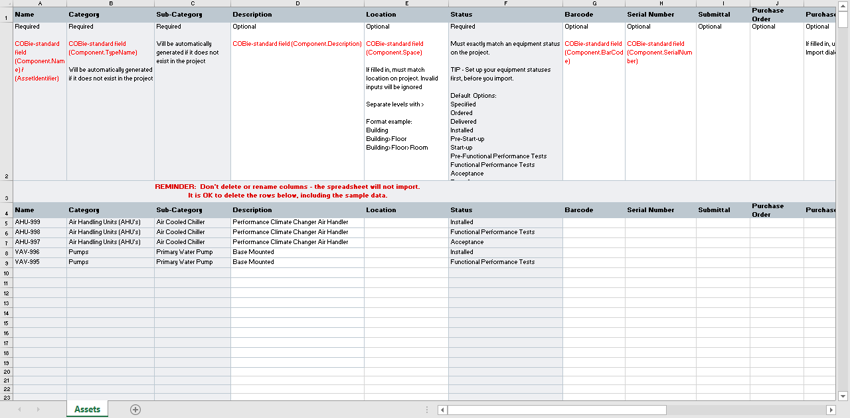
Fig. 4 Asset Import Spreadsheet Template
The spreadsheet contains some useful information about filling it out prior to import and indicates the fields that are mandatory to make the import work. It is also worth noting that if you have added any custom attributes you can add them here as additional columns and BIM 360 will import them along with the built-in attributes, as well as using the spreadsheet to create the categories and sub-categories for you. Remember not to delete or rename any of the columns, as this will prevent the import.
Generating the list in the first place is another subject. Is it included in the building information model, a COBie spreadsheet, or stored online (maybe using Autodesk Assemble)! There will almost certainly be required, some form of translation to get your asset list into the format required for BIM 360. Interestingly, there is a video included within the BIM 360 online help pages demonstrating how to extract asset information from Assemble, using their Excel plugin, although the final import into BIM 360 is less than clearly explained. I have included the link for information. [Link here]
Tracking Assets – Pre-installation
Once you have your assets in BIM 360 you will want to continue to add information to them. All the standard attributes are included in the module and there is the facility to add any other custom attributes that you may require. These can be assigned across the entire asset register, individual categories, or even a specific sub-category, with the option of making any of them mandatory.
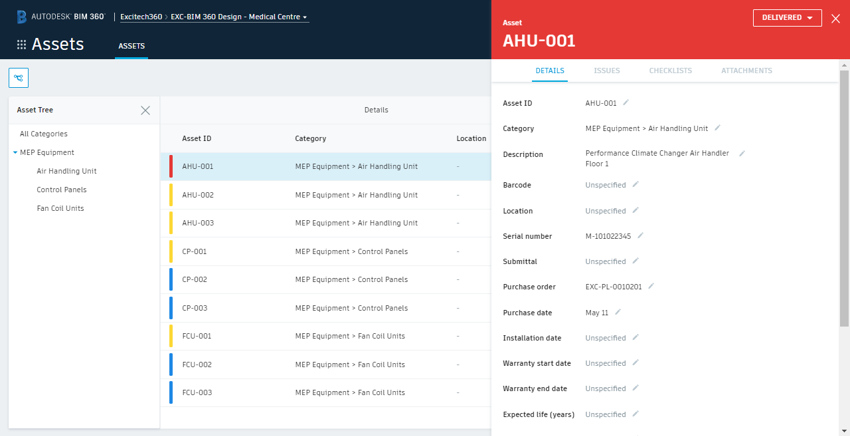
Fig. 5 Asset Information
At this point, all information is entered via the web interface and on an individual basis, such as adding purchasing and manufacturer information. It would be nice to see a multi-select feature here, to enable editing en-masse, and maybe this is something that will be available as the module is further developed. Having said that, the interface for editing asset information is good. Autodesk began some time ago to position the information screens to the right of the interface and static, so that different items can be selected without the need to close a properties window in order to select another item. This is a big improvement in functionality.
Tracking Assets – Installation and Commissioning
Tracking assets in the field is where BIM 360 Assets really comes to life. I captured all the following images using the IOS BIM 360 App. The App is also available for iPad and Android. The iPad app shows an expanded view of the asset information, but functions in the same manner as the IOS App.

Fig. 6 Asset List on IOS App
You will first be presented with a list of assets in BIM 360. At the bottom of the screen a filters button enables you to filter the list according to status. In the top right is a button to enable scanning of either an existing Barcode or QR code, activating the phone camera. As the barcode or QR code is found in the viewfinder, the app takes you directly to the asset to complete any assigned checklists or to change the asset status (“Tap and Track”). I will step back a little here and begin with some equipment that has just been delivered.
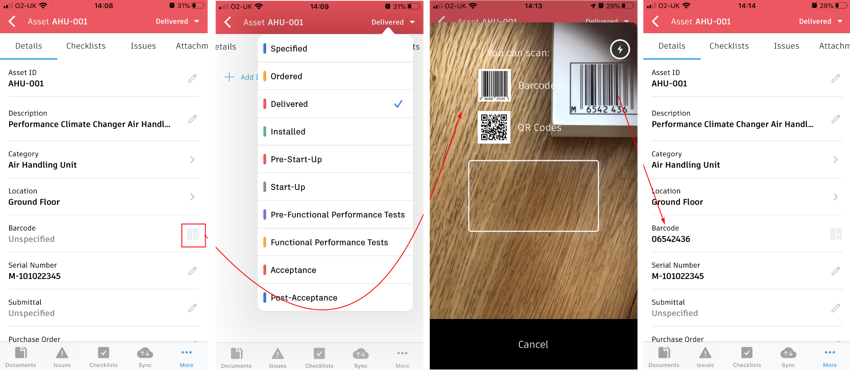
Fig. 7 Entering Asset Information on IOS App
Having selected the asset, you can change its status and record other delivery information as required. The barcode is assigned by simply selecting the button highlighted above. This will activate your phone’s camera and allow you to scan the barcode directly and return the information into the asset.
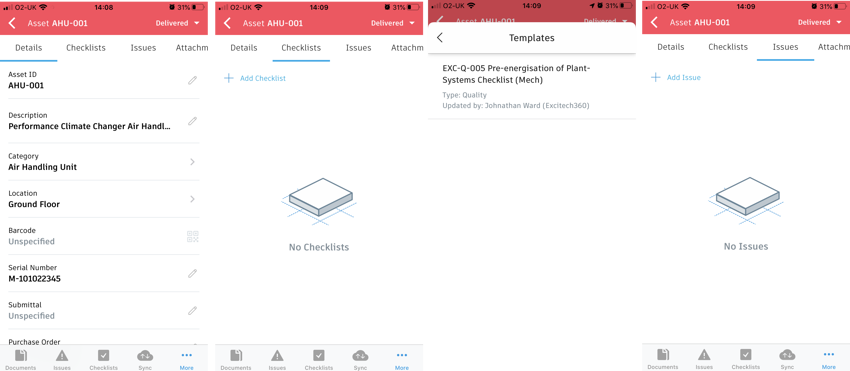
Fig. 8 Asset Tracking on IOS App
Along the top of the screen you will have access to checklists, issues, and attachments. From here you can assign any pre-installation checklists and subsequent commissioning checklists. Any issues with the equipment can immediately be flagged and assigned for resolution, along with any pertinent attachments (photos of damage of faults found during checking). During installation you can also record the location of the asset and this is linked directly to the locations configured in your BIM 360 project.
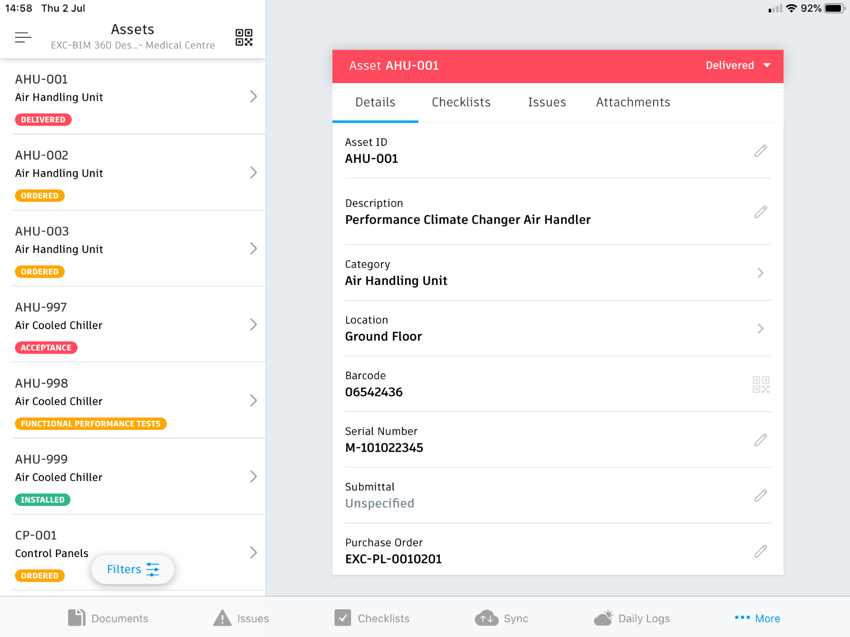
Fig. 9 Asset Tracking on iPad App
Exporting your Asset Register
The asset export option is located within the Assets module and will provide a simple .csv file, which can be opened in Excel.
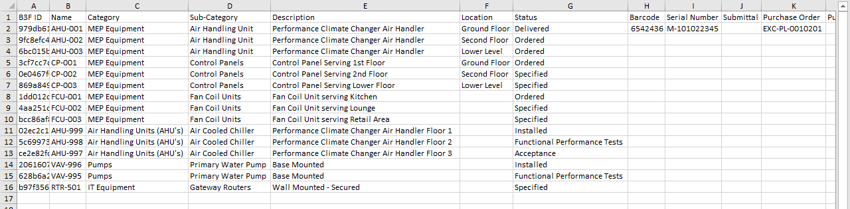
Fig. 10 Asset Export
This could obviously be saved as an Excel spreadsheet and then summarised using pivot tables, but you could also create a Power BI dashboard to present the data. I created a simple example, using the online version to simply highlight the number of assets at each status.
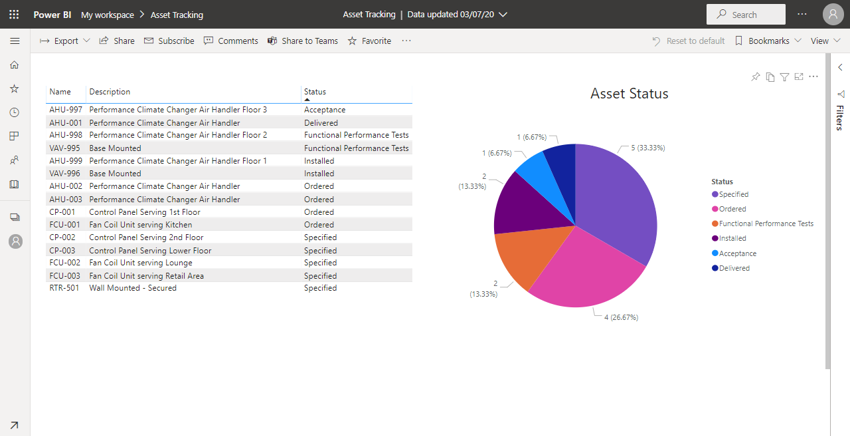
Fig. 11 Power BI Dashboard Example
Conclusions
Autodesk have made a great step forward with this, and the industry has been keenly awaiting its release. It builds on the format and functionality of BIM 360 Field Equipment but has made the process much more accessible as it can now be done with an android or apple phone which almost everyone on a building site has. Previously this was only available on iPads, but with the addition of smart syncing, the user hardware cost has reduced, and the usability has improved.
One addition to functionality of real benefit would be the ability to edit multiple assets at one time, this could save a significant amount of time adding purchasing information for instance. I await eagerly any future updates to the module.
If you would like any further information regarding Autodesk BIM 360 please call us on 0345 370 1444 or email info@symetri.co.uk.