info@symetri.co.uk
Converting files from Inventor 2023 to Fusion 360
The Product Design and Manufacturing Collection has allowed many customers to have a cost-effective licencing bundle that gives users access to multiple products to aid in their designing and manufacturing workflow. Both Fusion 360 and Inventor Professional are included in this licence and can be used in conjunction with one another, but many people are not aware of this functionality.

Although Fusion 360 has been gaining popularity among designers, many users who traditionally use Inventor for modelling are still relatively unaware of the benefits and unique features of built-in Fusion 360. While a designer may choose to model in Inventor, they can still utilise Fusion 360’s modelling, CAD, CAM, CAE and PCB capabilities by importing CAD files from Inventor. Likewise, a designer may prefer Fusion 360 as their primary design software but would like to transfer files into Inventor for its more robust drawing environment and integrations with Vault.
Using files designed in Fusion 360 in Inventor
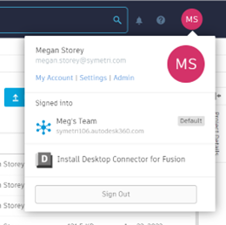
To seamlessly transfer files from Fusion 360 into Inventor, there is a need to install the Autodesk Desktop Connector app on your PC. This can be downloaded from Autodesk’s website here: Desktop Connector Release Notes | Desktop Connector 2023 | Autodesk Knowledge Network, or it can be downloaded from within the Fusion 360 application. To do this, you would open Fusion 360 on your machine and navigate to the button highlighted below, which will open Fusion 360 on the web. From here, you can hover over your initials in the top right-hand corner and in the drop-down menu, there is an option to download the desktop connector.
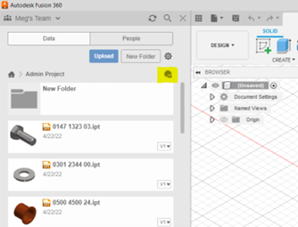
Once installed, the Desktop Connector creates a local drive on your machine, replicating the files saved in fusion 360’s cloud-based storage (Fusion Team).

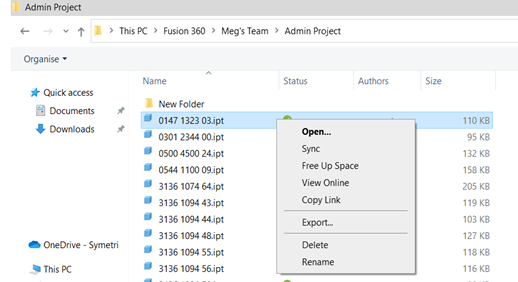
The Fusion Drive is a connected local drive which allows changes to be made on the files from within the desktop folder; these changes are then automatically updated in the original data source, so when the file is opened from within the Fusion team, any changes made from the Fusion Drive will be updated. Data can also be managed from within the Fusion drive, such as changing names or deleting files; there is also an option to ‘Free Up Space’, which allows you to remove the file from local storage but does not remove it from the cloud-based Fusion Team. This is ideal if you were short on space and didn’t need to use all files across applications.
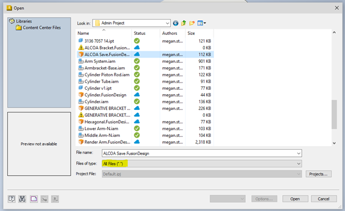
To open files saved in the Fusion 360 drive into Inventor, all a user must do is open these files from within the Inventor application by selecting open on the home page and select the Fusion 360 drive, then select the relevant Fusion team, then select the appropriate folder. It is essential to choose All Files in the browser dropdown, or it will only show you .ipt or .iam files and hide any Fusion Design files.

Then once a file has been selected, the user can convert this file to an Inventor model file and select which options they require regarding object filters and Part and Assembly Options. They can also change the name or location of the file at this point if they want to. This will create a native inventor file from which they can create a drawing view or continue to model In Inventor. This could then be added to the vault if users wanted to have saved files in here, although it is worth noting that this is now a separate file from the Fusion Design file we started with so many updates in Inventor would not be linked to the Fusion Team unless the file is saved in this drive.
Using files designed in Inventor in Fusion 360
One of the key reasons to use Fusion 360 in conjunction with Inventor would be to utilise the functions in Fusion 360 that are not offered in Inventor. In the latest release of Inventor 2023, Autodesk has made it simpler for users to put this into practice, as there is now a built-in Ribbon to allow file sharing to Fusion 360 from within the Inventor design space. To transfer a file created in Inventor into Fusion 360, all you need to do is navigate to the Fusion 360 tab on the Inventor 2023 ribbon, and this allows the user to select which area of Fusion 360 they intend to use the file in.
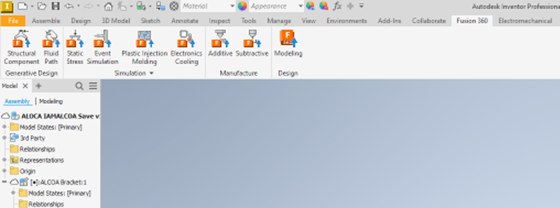
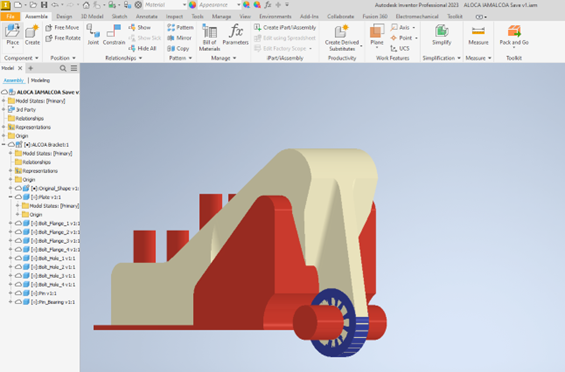
In this example, I will show how to take part modelled in Inventor Professional and take it into the Fusion 360 Generative Design space to use this powerful design tool. From the Fusion 360 Ribbon in Inventor, I will select Structural Component in the Generative Design Tab. An information tab would usually display at this point on the right-hand side of Inventor, but as I have used this feature before and selected ‘do not display this message again, I don’t get this pop-up anymore. Then you get a screen advising that this feature is managed by the desktop connector and to press open in Fusion to continue. Once the file has been opened in Fusion 360, you will notice that it will open into the specific area of Fusion 360 that we selected from the ribbon.
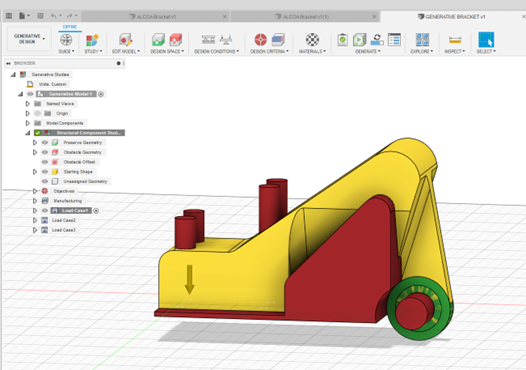
The Process of creating a generative design study is quite specialist, so I won’t go into much detail in this post on what I have done to create this design. However, once I have input all necessary data into the Generative Design study, I can run the Generative design by pressing Generate (cloud credit/flex token cost incurred at this point). After the cloud study has been processed on the cloud, the results are available to review.
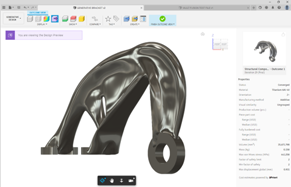
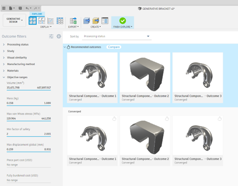
In this example, I have used the additive manufacturing method and managed to get the weight of the part down from 486g to only 168g whilst retaining the original material. I was also able to compare the benefits of different materials, manufacturing methods and designs to suit the needs of my design. This could be an incredible tool to test and develop designs you may not be currently utilising because of a historical preference to Inventor.
If you want to learn more about Inventor or Fusion 360, please contact Symetri.
Contact us
By completing the form below, or via email or telephone.
0345 370 1444

Securing the Modern Workplace
Learn how to protect your organisation from QR code phishing, adopt passkeys securely, and manage AI note-takers with the latest IT security advice from Symetri.

How AI Is Transforming Daily Work in Service Teams
Reduce downtime and improve service efficiency with AI-powered troubleshooting. Learn how service teams use ilean to solve problems faster and capture knowledge.

Visibility, Awareness and Control
Cybersecurity risks are not always caused by sophisticated attacks or major system failures. In many cases, risk builds quietly through everyday habits, overlooked processes, and limited visibility into where data is stored or how users interact with systems.
+44345 370 1500 · info@symetri.co.uk