
Streamlining Autodesk Deployments: How CQi Simplifies the Installation Process
For many organisations, Autodesk software is mission-critical — used daily across design, engineering, and construction teams.
Subassembly Composer is an application that is installed with Civil 3D and offers the possibility of creating your own subassemblies. You can then add those subassemblies to Civil 3D and use them in a corridor. This blog will show an example of how you would create a gabion wall subassembly that adjusts the number of levels based on an elevation target.

![]()
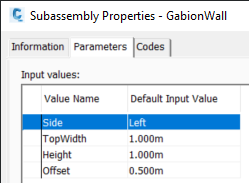
When you launch Subassembly Composer, the interface is divided into several panels. In the ‘Packet Settings’ panel, set the subassembly name to GabionWall. That is the name that will show in Civil 3D when the subassembly is imported into Tool Palettes.
Next, set some input parameters to define the dimensions of the gabion baskets. These parameters will be exposed in Civil 3D in subassembly properties and can be edited.
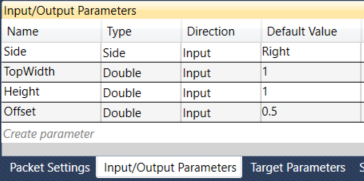
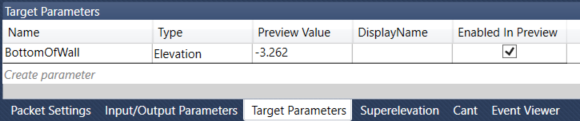
Still in the same panel, change to the ‘Target Parameters’ tab and add an elevation target, that will be used to work out the number of levels that are needed. Our subassembly will have a minimum of 1 and a maximum of three levels but you can easily add new levels following the same process.
We can now focus on the flowchart, which is where we can build the logic of the program. You can click and drag the corresponding nodes from the Tool Box to the Flowchart and then change the connections between them if needed. This is how the finished graph looks like, we will now start going through the process step by step.
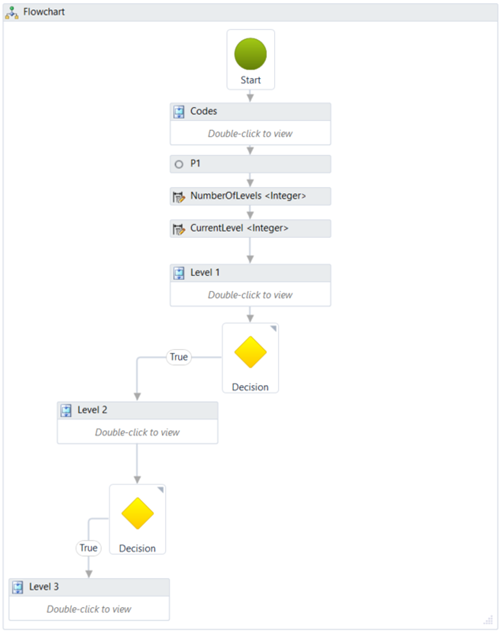
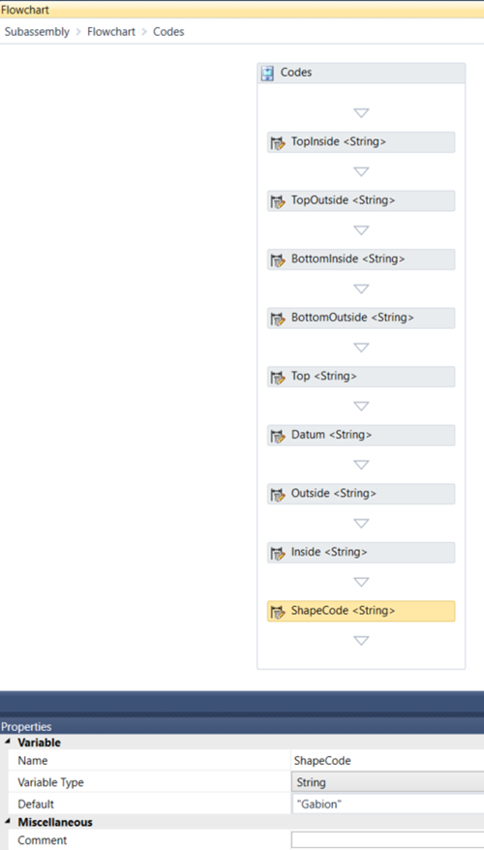
Insert a sequence in the Flowchart and rename it Codes. A sequence can be used to group a number of nodes that are related, helping you organise the chart. Inside the sequence, add a few ‘Define Variable’ nodes to create some variables that will define the point, link, and shape codes. By creating variables, we reduce the risk of typing the same code differently if it needs to be assigned multiple times. It will also make it easier to change the codes once the chart is finished.
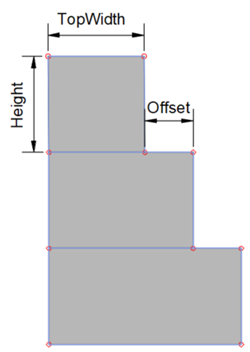
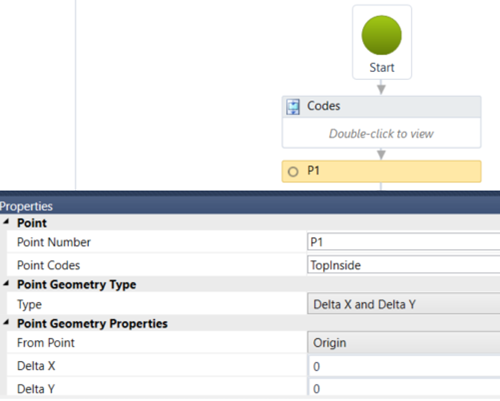
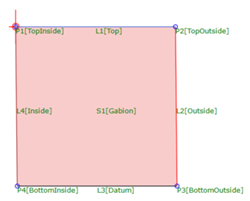
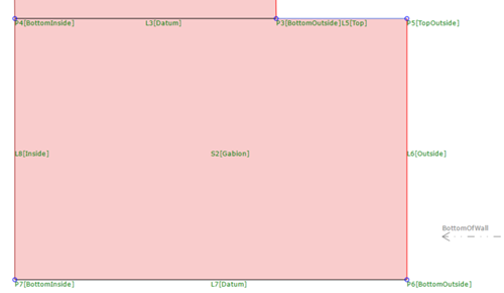
Add a Point node after the Codes sequence in the origin and assign a code of TopInside. This point represents the attachment point of the subassembly.
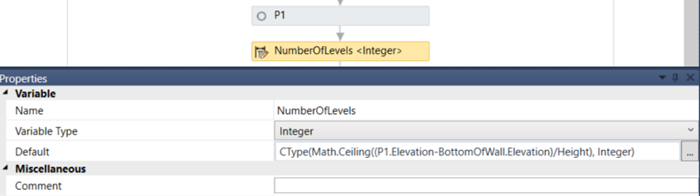
Next, we define a variable NumberofLevels to control the number of levels that are needed based on the elevation of the attachment point, the elevation target, and the height of each gabion basket. Assign the following formula to the value of the variable:
CType(Math.Ceiling((P1.Elevation-BottomOfWall.Elevation)/Height), Integer)
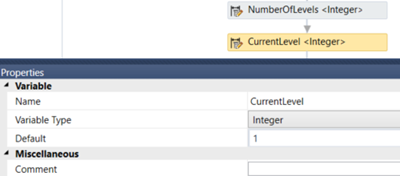
Now define another variable Currentlevel to keep track of the level we are in and initialise it with a value of 1.
Include the geometry of the top level in a ‘Level 1’ sequence by adding Point, Link and Shape nodes and assigning the codes as indicated in the preview below. At the end of the sequence, increase the CurrentLevel by one using a ‘Set Variable Value’ node.
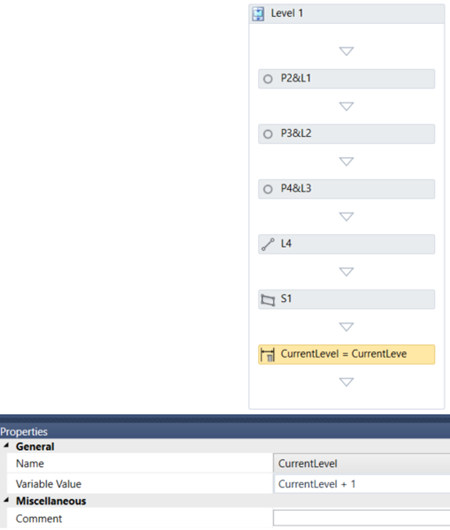
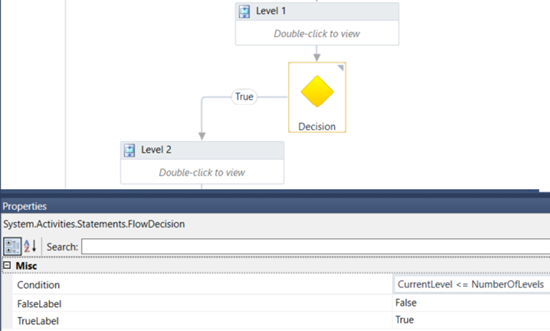
Insert a Decision node to determine if we continue to the next level or if we stop at this point. The condition to check is ‘CurrentLevel <= NumberOfLevels’. If it evaluates to True we will proceed to level 2, otherwise, the execution will end.
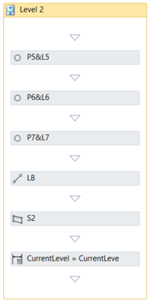
Copy the sequence used for level 1 and modify it accordingly to reflect the geometry of level 2. Note how you can drag the BottomOfWall elevation target and the preview will update, modifying the number of levels as needed.
Create level 3 (and subsequent levels if desired) following the same logic and save the packet file as ‘GabionWall.pkt’. There just remains to add the subassembly to Civil 3D.
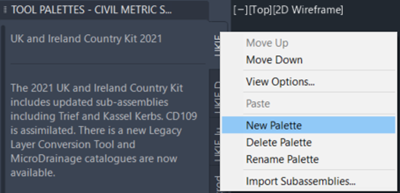
Open Tool Palettes in Civil 3D, right click on one of the existing tabs and add a new palette.
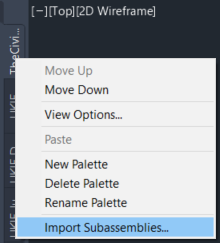
Right-click on the newly created tab and import the subassembly:

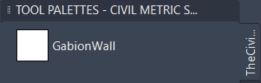
The subassembly should now display in Tool Palettes, ready to be inserted into an assembly.
It can now be used on a corridor where the baseline represents the top level of the gabion wall, the bottom level is given by an elevation target (e.g. a profile) and the length of the baskets is controlled by the frequency.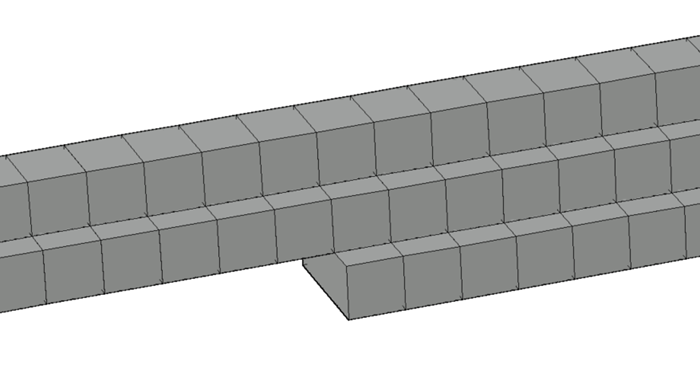
If you would like help with content creation, application automation, project support and much more, visit our website to explore our consultancy services here.
For many organisations, Autodesk software is mission-critical — used daily across design, engineering, and construction teams.

Discover how combining CQFlexMon with CQI provides a complete solution for CAD software deployment and monitoring. Improve software efficiency, reduce risk, and streamline your IT operations.

Cybercriminals are always evolving, and so should your defences. This month, we shine a spotlight on three often-overlooked yet critical security concerns that could put your business at risk.