info@symetri.co.uk
Fusion: An Introduction to Automated Modelling
Fusion is celebrated for its cutting-edge approach to design and manufacturing, delivering advanced technology while keeping usability front and centre. Its latest feature, Automated Modelling, takes this a step further by combining intelligent design tools with workflow efficiency, helping users create complex models faster, smarter, and with less effort.

Eagle-eyed Fusion users will have noticed the new Automate feature in the design ribbon and may have even tried out this new feature, but for those who haven’t explored Automated Modelling, here we will discover its potential.
What is Automated Modelling?
Automated modelling is a new feature that takes elements from the ‘loft’ design tool and the AI-based Generative Design feature to join multiple features and produce numerous design options that a user may have never imagined. Unlike the loft tool, Automated Modelling can create a transitional shape between multiple solid bodies, not just between faces. This means far more complex and innovative bodies can be created, which previously would have taken a user a lot of time and multiple operations to complete.
Automated Modelling can also bridge the gap between the standard Fusion design workspace and the Generative Design Extension. This tool allows a user to generate AI powered designs by selecting which bodies to join and which to avoid. However, Automated modelling doesn’t cost the user a penny in cloud credits. It also doesn’t require the user to enter any load constraints or select any manufacturing restrictions like in Generative Design which also makes the process of generating bodies much quicker. Although inspired by Generative design, the Automated Modelling feature doesn’t replace the AI extension as the results generated are not based on the same manufacturing or load requirements and are intended to be used as a tool to solve design problems uniquely and can then be further refined and developed.
How do I use Automated Modelling?
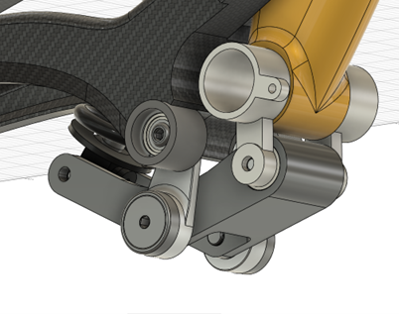
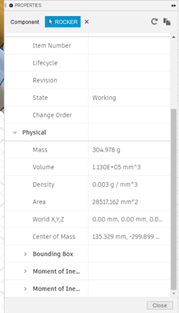
Taking this example from the Fusion design sample folder, we can illustrate how Automated Modelling can improve a straightforward design and reduce material use. The original design uses a simple aluminium rocker which connects multiple brackets at the bottom of the frame. Although this part has no problem, it is very simple in its design and rather heavy at 304.9g.
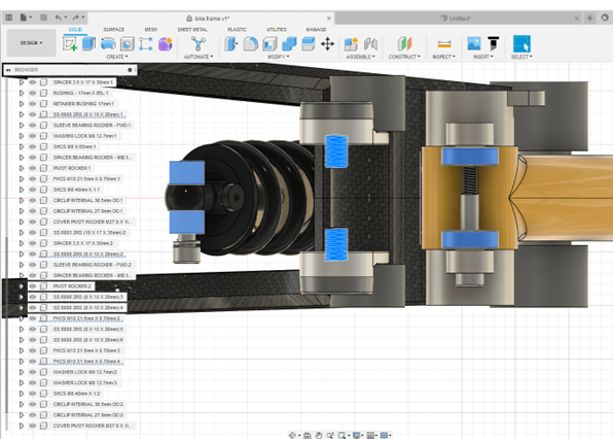
When removed from the design, we can see all six bodies that need to be connected. This is where we can use Automated Modelling to create a new body that innovatively addresses a design problem aesthetically and significantly reduces the material mass.
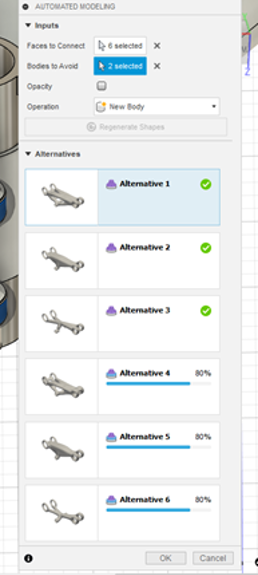
Once you have decided which bodies need to be connected, you can also consider if any bodies need to be avoided. This is optional but may be helpful when creating bodies in more complex and crowded spaces. When you select the Automate button on the Design ribbon, the Automated Modelling window appears in the workspace. Here you can choose any faces that need to be connected, which will show in blue. Then you can select any bodies to avoid, which will show in red. This is the only data the user needs to input, making it very quick to complete.

Then the user needs to select Generate Shapes, which will create ten unique designs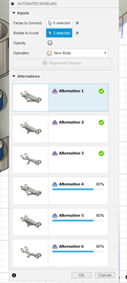 ; this is done on the Fusion cloud, so it can take a few minutes to complete and will vary based on the complexity and the user’s broadband speeds. For anyone who has used Generative Design before, this process takes a fraction of the time to complete as it is much fewer data intensive. On this occasion, the creation of my ten designs took 3 minutes to complete fully, which is significantly quicker than if I had to design this part myself. The progress of your design suggestions is displayed whilst you wait, and you can view the completed models before all ten have finished.
Why should I use Automated Modelling?
Once you have reviewed your designs, you can select which design suggestion you want to continue with and further refine this in the design workspace. The example I have chosen has an asymmetric form which has been calculated based on the starting bodies we were working around. This is optimised for strength whilst minimising the mass of the part using a design that would have taken a designer a very long time to model if they would have ever been able to get there at all. In my example, I have managed to shave off 99.287g, which is almost a third of the weight of the original rocker.

This can then be taken into the simulation environment to run analysis on various stress tests and developed further from their results. From here, you can take the model into the CAM environment and create toolpaths to manufacture the part or create a render of the product in the render space to create a photorealistic image of the new design.
Automated modelling can be used in many different applications and can not only save time, materials and weight but can also give a designer a new idea to work from. It can also be used as an introduction to generative design to level up your design workflow.
If you would like to find out more about Fusion and its design capabilities please get in touch.
Contact us
By completing the form below, or via email or telephone;
0345 370 1444

Visibility, Awareness and Control
As organisations continue to adopt AI, expand their cloud estates, and support more flexible ways of working, the security landscape is becoming more complex. The challenge in 2026 isn’t just preventing attacks, it’s maintaining visibility, protecting data in new workflows, and ensuring the business can recover quickly when disruption occurs.
Bluebeam Max: The Superpower Taking Revu Into the AI Era
The construction industry is entering a new era, and Bluebeam is once again leading the way. In 2026, Bluebeam Max will launch as a new premium subscription that combines the power of Revu with advanced AI technology. This blog highlights just some of features you will expect to see within Bluebeam Max.
What’s New in Inventor 2027: A Guide to the Latest Features
Consultant Jason Kelly explores the new 2027 features in Autodesk Inventor Professional. Including updates to the content center and Autodesk Assistant
+44345 370 1500 · info@symetri.co.uk