
How AI Is Transforming Daily Work in Service Teams
Reduce downtime and improve service efficiency with AI-powered troubleshooting. Learn how service teams use ilean to solve problems faster and capture knowledge.
It’s that time again and this years’ crop of new releases is upon us. Just like the competition to hear the first cuckoo in spring, there will be the clamour on the Excitech CAD support line to be the first to deal with the annual chorus of “how do we get the classic workspace back in AutoCAD”.
There are those who pour scorn on the notion of a return to a previous user interface. Why after all, would anyone want to return to something so basic and static when the Autodesk development team have poured their heart and soul into inventing new interactive ways to communicate with AutoCAD.
AutoCAD 2017 is a far cry from the original, with powerful features such as 3D modelling, Database connectivity and PDF import to name a few, so it’s fair to say that some of the most modern features simply won’t be accessible via the “Classic Workspace”.
It does however beg the question, what is the classic workspace?
Since I first pushed a cursor around a digitising tablet some 30 odd years ago, the worlds’ favourite CAD software has seen more than a few changes but the original interface is still slumbering beneath todays’ sleek and highly efficient display.
Here’s an impression of how AutoCAD looked when I first opened a drawing back in 1985:-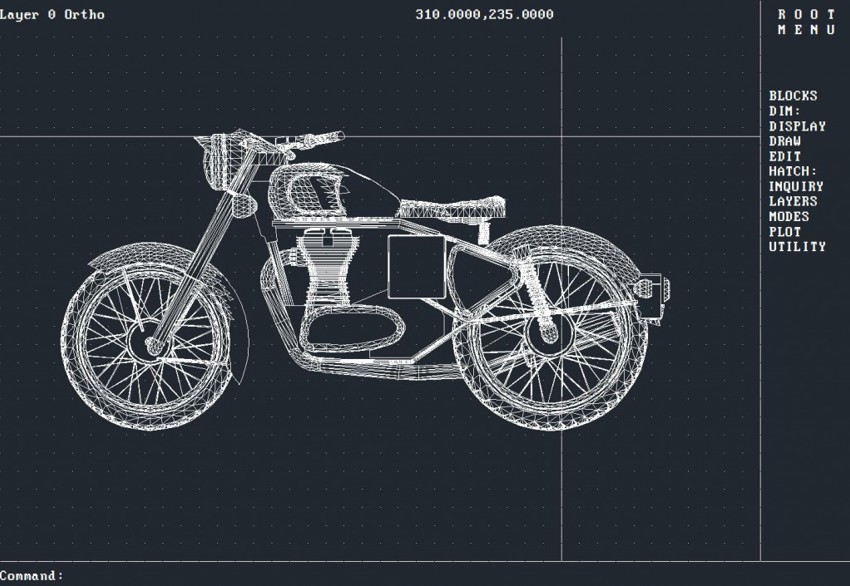
The main elements were the layer and mode display in the top left, coordinates read out, top centre, command prompt at the bottom and the screen menu to the right. One part of the GUI that never shows up in the screen shots is the tablet menus that adorned the surface of the digitising tablet everywhere. These where an early form of toolbar menu and consisted of printed squares that corresponded with the position of the cursor on the tablet.
So for those of you pining for the days of the new romantics, miners’ strike, hairspray, rah-rah skirts and shoulder pads, here’s how to reinstate AutoCADs’ “Classic” workspace.
Let’s start with a drawing of our bike opened in the current AutoCAD 2016 3D modelling workspace with a few tool palettes open for good measure.
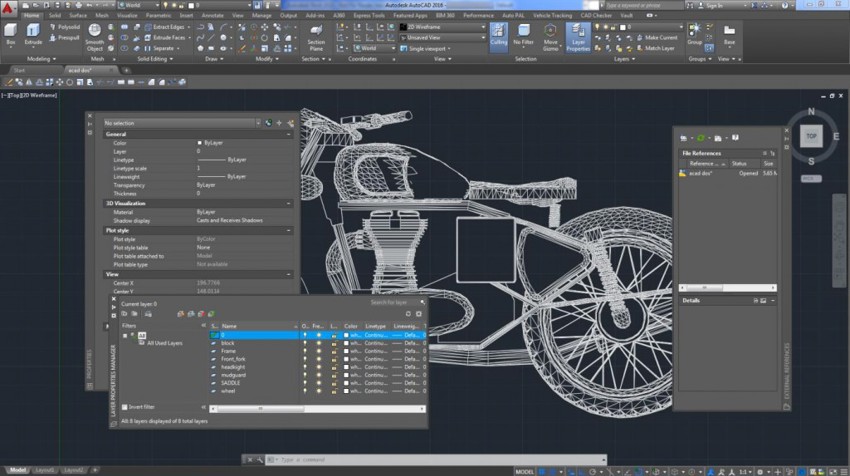
You’ll notice that in my workspace, I also leave a toolbar open to make it easier to restore the 2006 workspace. If you want to restore that look and feel, use the –Toolbar command to show or hide the toolbars and Menubar to restore the pull-down menus.
Back to our 1980s workspace and the first thing to clear are the palettes. Simply click on the X at the top of the spine to close. There is also an X on the toolbar but it can also be closed by typing –Toolbar at the command line followed by ALL then H for hide.
Ribbon Menus didn’t exist at the end of the cold war and it is tempting to close them using the RIBBONCLOSE command but the view tab has some useful buttons that will help us prepare our workspace. Here we can close the View Cube, Navigation Bar, File Tabs and Layout Tabs.

Now let’s lose the customisation buttons at the bottom of the screen. These are controlled by the menu that pops up from the menu button at the very bottom right of the application.
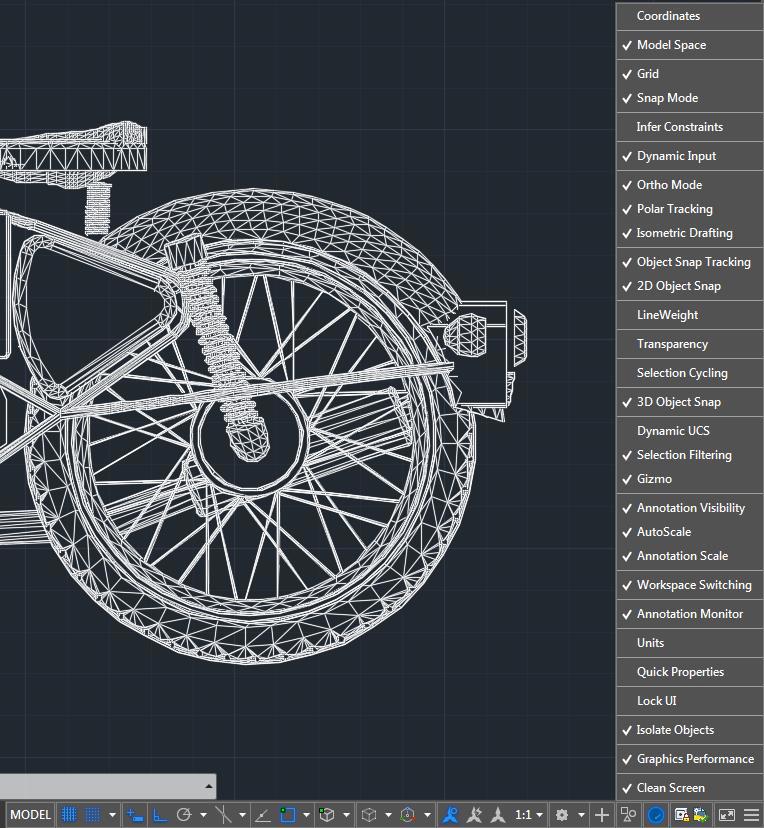
Uncheck each item to clear.
In the original AutoCAD, the crosshair spanned the whole height and depth of the screen. There is a control for that on the Display Tab on the options dialog.
![]()
We can now type RIBBONCLOSE to get rid of the ribbon menu!

We can also resize the command line area by dragging it to full width and allowing three lines of history.
A fairly recent (well within the last 10 years!) addition is the improvement in grid display. This is controlled with the GRIDSTYLE and GRIDDISPLAY commands. GRIDSTYLE sets the style of the grid which back in the 1980s could only be represented by dots and a GRIDSTYLE value of three restores this. GRIDDISPLAY controls the extents of the displayed grid and a value of two sets the extents to the drawing limits. Incidentally, the default drawing limits in 1985 were originally set at 420 x 210 drawing units.
Having removed so much of the current interface, it’s now time to put something back. The original AutoCAD left a blip mark at every point picked for a line and the main method of command input (apart from the command line) was the Screen Menu at the right of the screen. Both of these were removed from AutoCAD in the 2012 release but remain as undefined commands. Fortunately, we can restore them with the REDEFINE command. With BLIPMODE redefined and set to one, the points picked on a line are visible again.

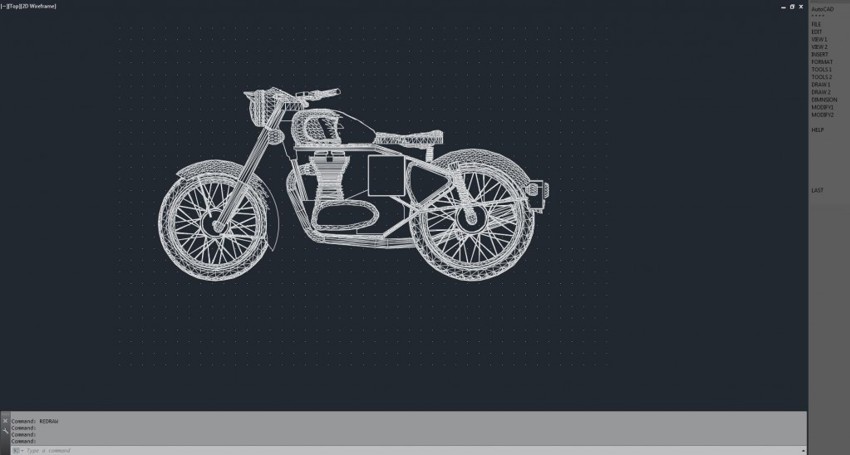
Similarly, use the redefined SCREENMENU command to bring back the classic AutoCAD menu by setting its value to one. Our “Classic” workspace is now complete!
Reduce downtime and improve service efficiency with AI-powered troubleshooting. Learn how service teams use ilean to solve problems faster and capture knowledge.

Cybersecurity risks are not always caused by sophisticated attacks or major system failures. In many cases, risk builds quietly through everyday habits, overlooked processes, and limited visibility into where data is stored or how users interact with systems.

Learn how to reduce cyber risk through stronger security foundations. This month's bulletin covers home office security, legacy technology risks, vulnerability management, MFA, and cybersecurity best practices.