
How AI Is Transforming Daily Work in Service Teams
Reduce downtime and improve service efficiency with AI-powered troubleshooting. Learn how service teams use ilean to solve problems faster and capture knowledge.
In this blog, we navigate through the Ambience setting in Twinmotion. Unveil the potential to elevate your Revit projects that goes beyond visual appeal, adding depth and mood to your designs.
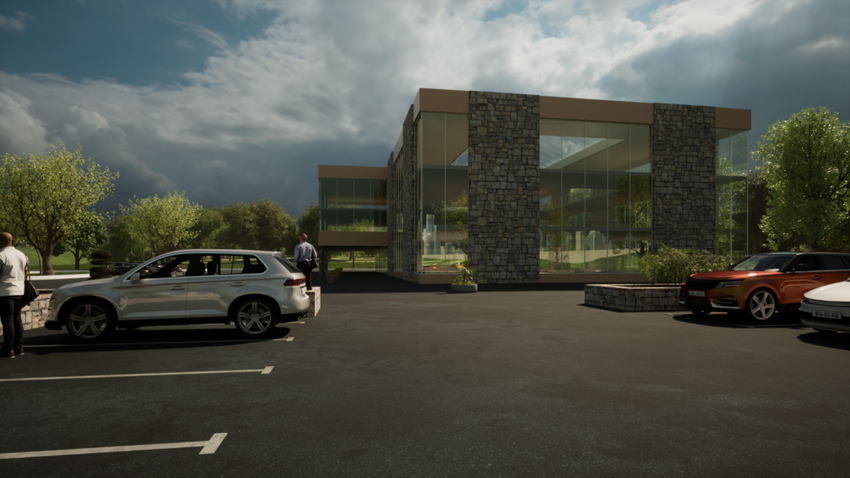
Using the same Revit import and using the Day Night Template mentioned in my previous blog, it has given a great start for additional views. Below shows an exterior from the project and I have added more content together with textures from the Twinmotion library.
 Le
Le t’s look at the Ambience setting. Firstly, the ambience settings are relevant to either the working view or one of the Media views.
This shows the Exterior A media view, where I have ambience selected in the graph view. The Ambience is the first item on the scene list just above the Scene graph. At the bottom, both Scene and Properties are selected. These are then the properties of the Ambience.
There are five options on the Ambience properties tab. These are Env, Camera, Render, FX, and Image.
The most options will be on the Env or Environment tab. These are Global Lighting, Weather, Location, HDRI Environment, Horizon, and Ocean.
Looking at my settings, you can see that Time of Day is greyed down and is not available. This is because I have an HDRI enabled as a skydome, therefore the lighting is derived from the HDRI.
 Moving down the HDRI Environment tab you will see a dropdown for details and here you are able uncheck the Lock Sun to HDRI. This allows you to go back to the top of the Global Lighting section and change the time of day independent of the HDRI. I find this quite useful in getting the mood.
Under Global Lighting, you see Exposure and a details dropdown. This is where I would fine tune the environment with Ambient Light and white balance.
Other features are here on the environment tab, location, Horizon and Ocean. As a Revit exterior I see that we have a huge amount of scope with the HDRI lighting.
 The next Tab is for the camera. The main edit I would do here is the Focal Length, mostly looking at something like a 23mm for Revit exteriors. Under Camera effects, I would activate Parallelism to maintain parallel vertical lines as seen in many Architectural visualisations.
Moving over to the Render tab, we see Realtime and Path tracer. The Realtime is the view you see as you move around the scene. The path tracer is the GPU render. There are three settings for the quality of the Path tracer: low, med and high. Expanding the Details dropdown allows some edits. Samples per pixel and Max bounces can be adjusted here. You will also see that the denoiser is active and I have set antialiasing to 3 pixels. Sometimes images show single pixels of white in the render particularly on reflective surfaces and this is often called Fireflies and having Fireflies threshold is worth adjusting, if this white pixel happens.
 Adjusting Global Illumination and Shadow in the Realtime render options can actually make for a very good quality image without the need to Render through the Path tracer. Activating Reflections –
SSR under Misc is also a great option on real time render. SSR stands for Scene Space Reflections and essentially allows objects to reflect each other in the Realtime render.
The FX tab allows a few post render effects like Contrast and Saturation. I particularly like the Clay render with options like excluding Other as this will create a clay model to all, except my Revit building.
 The last tab on the Ambience panel is for the output of the image. Here we can adjust the resolution of the final render.
2K Full HD 1920 x 1080. 4K 38040 x 2160, and 8K 7680 x 4320. Or as a custom resolution.
Be aware that in trial mode on Twinmotion, you will only have HD format at 1920 x 1024.
The Ambience features are very comprehensive and contained within simple sliders, making it very easy to adjust and see immediate revisions and changes.
HDRI lighting is very quick and the features on the Environment tab are exceptional for a Revit exterior or interior, adding height fog and adjusting Vegetation growth.
Reduce downtime and improve service efficiency with AI-powered troubleshooting. Learn how service teams use ilean to solve problems faster and capture knowledge.

As organisations continue to adopt AI, expand their cloud estates, and support more flexible ways of working, the security landscape is becoming more complex. The challenge in 2026 isn’t just preventing attacks, it’s maintaining visibility, protecting data in new workflows, and ensuring the business can recover quickly when disruption occurs.
The construction industry is entering a new era, and Bluebeam is once again leading the way. In 2026, Bluebeam Max will launch as a new premium subscription that combines the power of Revu with advanced AI technology. This blog highlights just some of features you will expect to see within Bluebeam Max.